Fine Motor Activities for Preschoolers With Play Dough

A blob of play dough does more for your preschooler’s hands than any tracing worksheet, because squishing, rolling, and pinching are the exact movements that build the little muscles behind holding a pencil. I’m Nora Hayes, a former preschool aide who’s run hundreds of these setups with my own two kids, and the fine motor activities for preschoolers I keep coming back to all start with a $1 tub of dough.
This guide walks you through the playdough activities for fine motor skills that actually earn their mess, the tools that level them up, and how to match the right one to your child’s age and how they like to play.
Why Play Dough Builds Strong Little Hands
The short answer: dough pushes back. That resistance is exactly what small hands need to develop the strength and control that carry a child from scribbling to writing.
The Hand Muscles Dough Wakes Up
Most people picture the hand as one working unit, but the muscles that matter for writing are deep inside the palm. The intrinsic hand muscles control finger isolation (moving one finger without dragging the others), and they’re the same ones that eventually power a stable pencil grip.
Every squeeze, poke, and press into dough loads those muscles directly. Squeezing a ball builds overall hand strength. Rolling a snake between the palms develops the arching of the palm itself. Pinching off small pieces is a grasp development exercise disguised as playing.
According to research on fine motor development in early childhood, occupational therapists recommend 15 to 30 minutes of fine motor activities daily for children ages 2 to 6, with ages 3-5 identified as the prime window for building intrinsic hand strength. Ten minutes with dough counts.
Dough vs Worksheets for This Age
Tracing worksheets have their place, but not yet. Before a preschooler can control a pencil, their hand needs the dexterity to hold one. A passive worksheet page doesn’t build that strength. It just asks a child to perform a skill they haven’t physically developed.
Dough gets there first through self-directed play. When a child decides to flatten a ball, roll it into a log, then poke holes with their finger, they’re cycling through resistance patterns on their own terms. That’s the repetition that builds the hand. No adult prompting required.
For more on how these skills stack on top of each other, see the real order fine motor activities develop in before jumping ahead to pre-writing activities. And when dexterity is ready, fine motor tracing handwriting scissor skills picks up where sensory play leaves off.
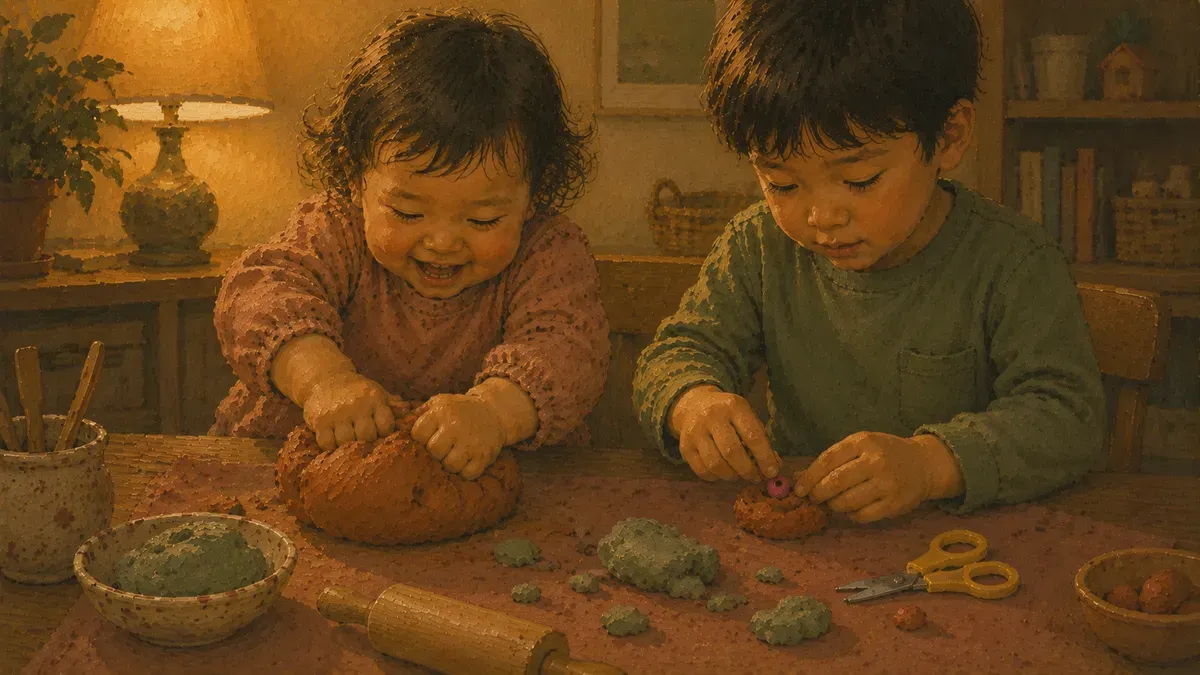
12 Play Dough Activities That Strengthen Fine Motor Skills
Grab the tub and start here. These break down into three moves your kid already wants to make: pinching tiny bits, working the whole hand, and digging for buried loot.
- Pinch and pull: finger isolation using the thumb and index finger
- Roll, squash, and squeeze: whole-hand resistance that builds grip strength
- Hide and find: digging out buried objects to combine pincer work with hand-eye coordination
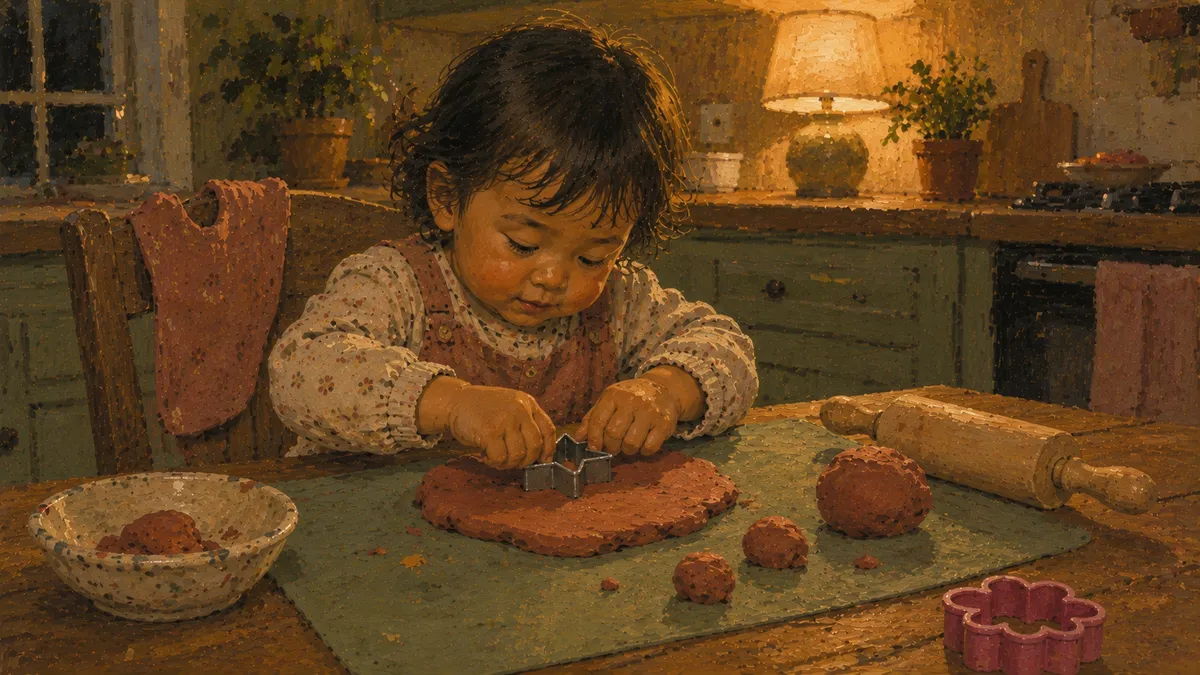
Pinch and Pull Activities
The smallest motions do the heaviest lifting. When your kid pinches off a pea-sized ball and rolls it between thumb and finger, they are firing the exact same muscles a pencil will need later.
Start simple. Tear a fist of dough into the tiniest pieces they can manage, then pull a snake apart bit by bit. The point is finger isolation, just the thumb and index finger working while the rest of the hand stays out of it.
This is the move behind the pincer grasp, the fingertip-only pickup that, per Cleveland Clinic, typically shows up around 12 months and sets the stage for holding a pencil. Pinching dough keeps strengthening it long after.
These fine motor activities with playdough double as precision activities you can do at the kitchen table with zero setup. If two minutes is all you get before they bolt, that still counts.
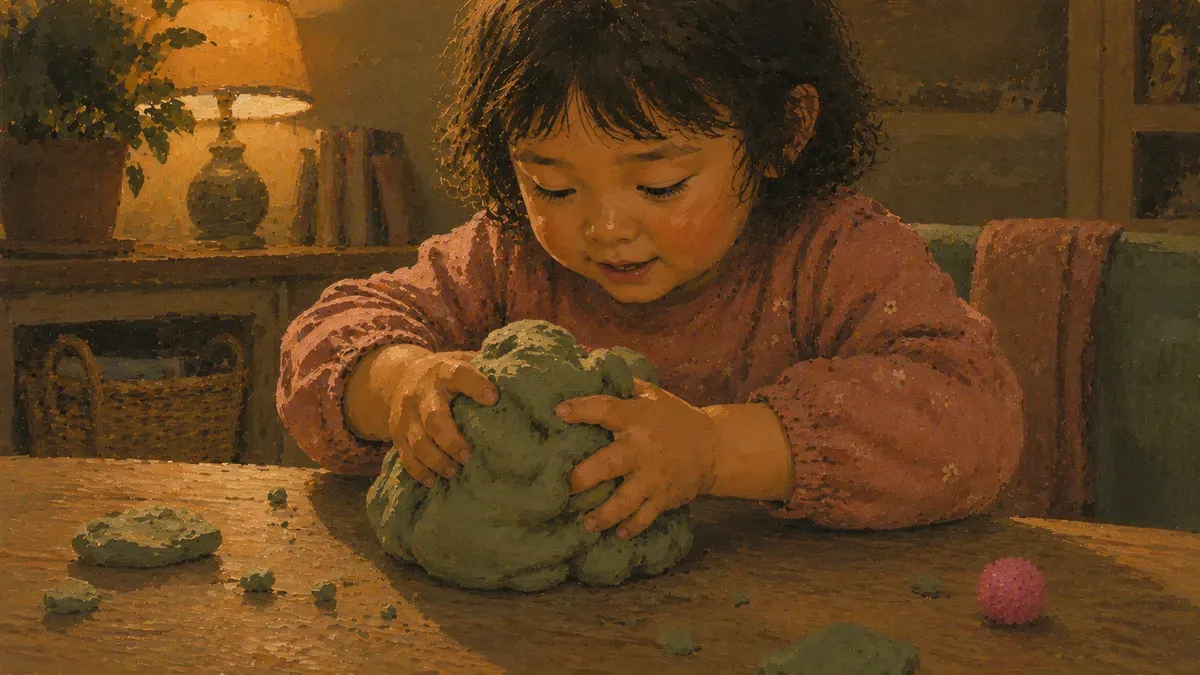
Roll, Squash, and Squeeze Games
Pinching is delicate work. Now flip it, and let the whole hand get loud.
Occupational therapists call squeezing, rolling, and pressing dough the proprioceptive ‘heavy work’ that strengthens the arches of the hands. In plain terms, it is the resistance that makes little hands stronger.
Make it a game. Roll the longest snake on the table, both hands working together. Flatten a pancake big enough to cover a plate, pressing through the heel of the palm to load the wrist and forearm. Squeeze and count how long they can hold the squish.
- One-hand squeezing: raw grip and dexterity
- Two-hand rolling: bilateral coordination, both sides working together
These playdough activities for fine motor skills are the ones I reach for when a kid is wound up and needs to push hard against something. Big effort, big payoff.
Hide and Find Buried Treasures
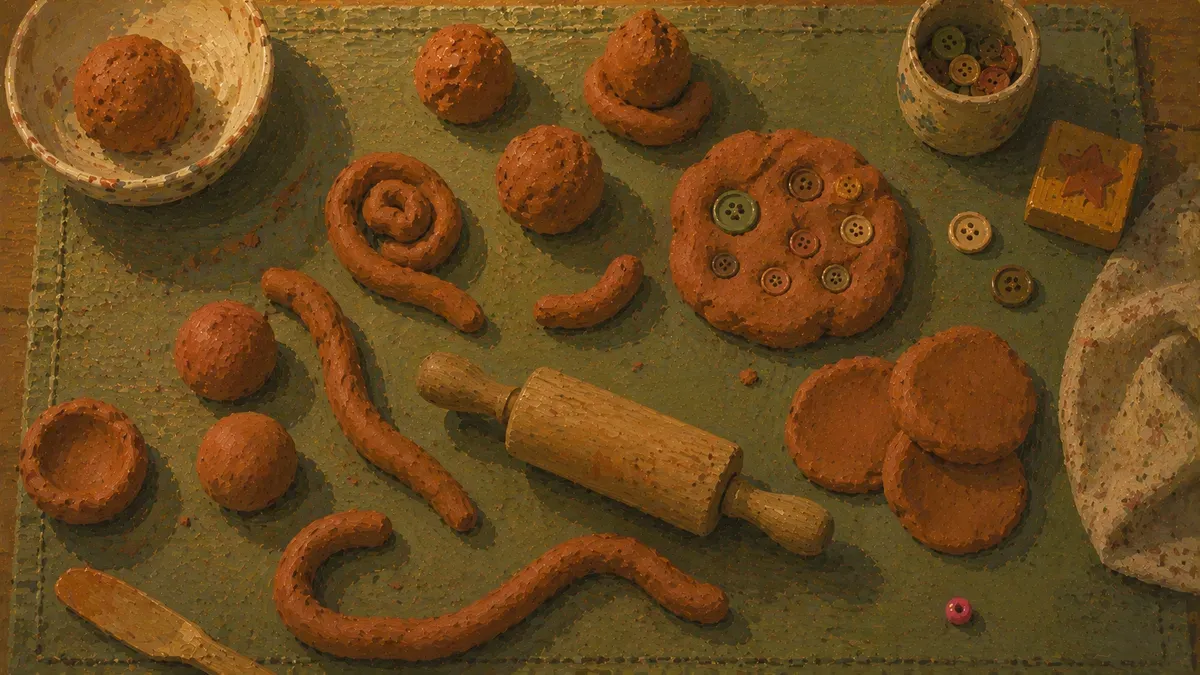
Now add a hunt. Press beads, buttons, or a handful of Cheerios deep into a ball of dough, seal it over, and hand it back. The job is to dig every one out.
This one sneaks in real work. Finding a bead is hand-eye coordination, and prying it loose is pure pincer grasp and finger strength, the same precision activities from the first move, now with a reward at the end. Kids who quit plain pinching will excavate a dough rock for ten solid minutes.
- Beads: hardest to pry out, best for kids with solid pincer grasp
- Buttons: mid-sized, good starting point for most toddlers
- Cheerios: big enough to find fast, great for younger kids who need a quick win
Stretch it further by sorting the finds. Sorting layers in a second skill and buys you a few more minutes.
For a younger toddler, use bigger objects pressed in shallow so the win comes fast. These playdough fine motor activities pair beautifully with a quick fine motor skills activity before they sit, when you want hands warmed up and ready. Hide more, hide deeper, and the challenge grows right alongside them.
Adding Tools: Snipping, Rolling, and Poking
Bare hands do plenty, but the day your kid masters the squish, a few cheap tools turn the same ball of dough into a fresh challenge. Here’s how snipping, rolling, and poking each pull a different set of muscles.
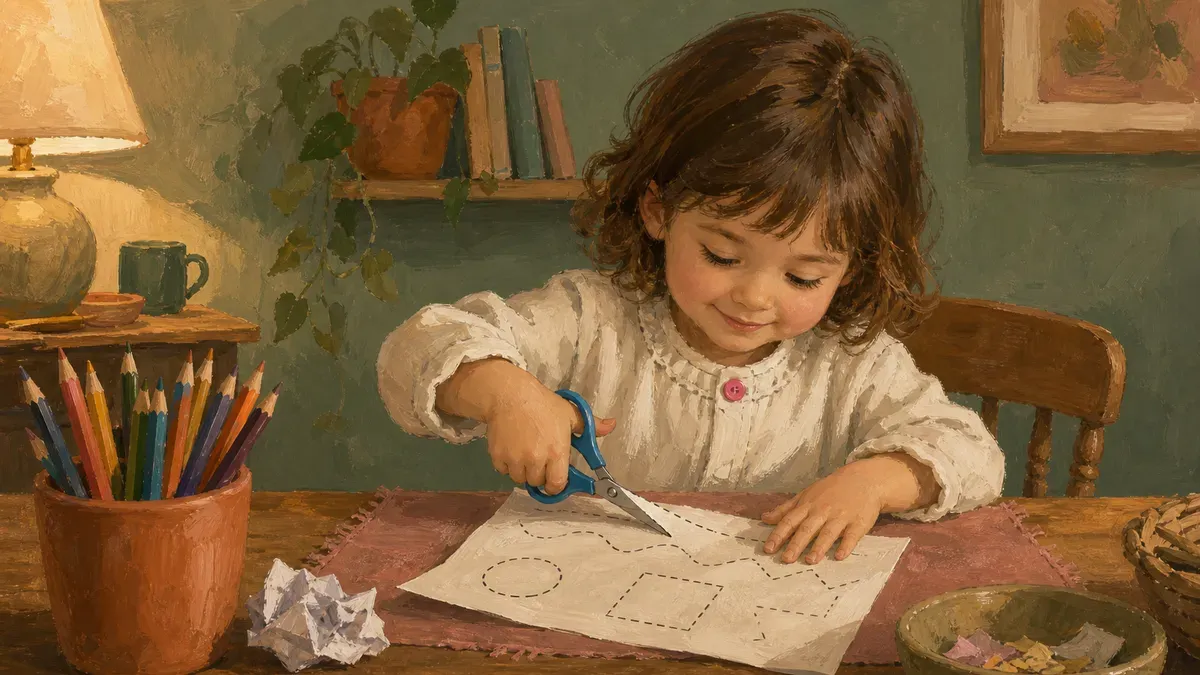
Snipping Dough With Safety Scissors
Hand a toddler scissors and paper and you’ll watch it crumple, fold, and frustrate. Hand them a rolled dough snake and the blades bite clean through. That’s the magic: dough cuts easily and forgives a wobbly, off-center line, so there’s no wrong way to do it.
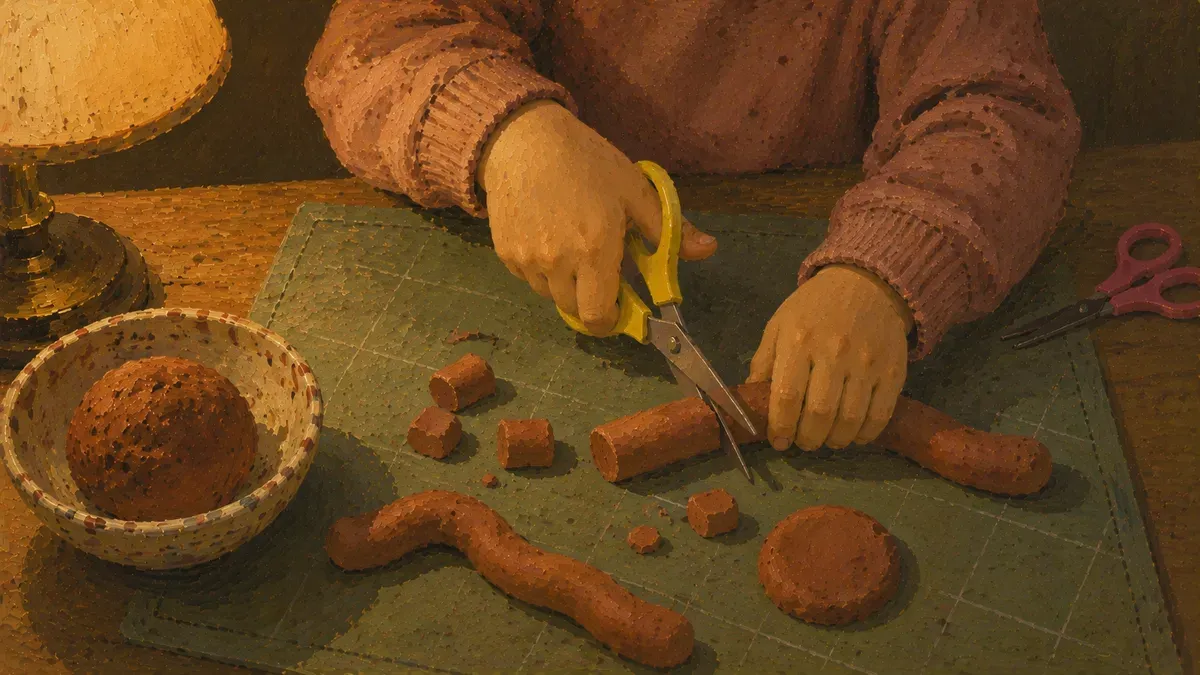
This is real scissor skills practice before paper ever enters the picture. An NHS occupational therapy resource places play dough and clay cutting at ages 2 to 2.5, well before kids are ready to cut paper, with full scissor control not landing until around age six. So if your three-year-old is still hacking instead of slicing, that’s right on schedule.
Roll a snake, hold it taut with one hand, snip with the other. That two-handed teamwork is bilateral coordination and hand-eye coordination doing quiet work while it just looks like play. Ready for the paper version? Our scissor practice worksheets and cutting activities are the logical next step.
Rollers, Cutters, and Extruders
Three tools, three completely different jobs, and most activity lists lump them together.
- Rolling pins demand flat palms and even downward pressure from both arms. Pure hand strength and bilateral coordination, since one lazy hand makes a lopsided pancake.
- Cookie cutters are a press-and-lift move that builds dexterity. Little hands learn to push straight down, then peel the shape away clean without smushing it.
- Garlic-press extruders are the sleeper hit. Squeezing dough into spaghetti strands takes serious grip force, the kind of whole-hand work that tires a kid out in the best way.
Rotate through all three in one sitting and you’ve covered force, then precision activities, without buying a single “educational” toy. The garlic press from your drawer beats most of them anyway.
Poking With Tweezers and Pipe Cleaners
Flatten a thick dough base and it becomes a pincushion for the most precise work yet. Pushing pipe cleaners, golf tees, or dry spaghetti straight down trains finger isolation, that tricky knack of moving one finger while the rest hold still.
The same NHS list puts tongs and tweezers in the pre-scissor toolkit for exactly this reason: gripping a tweezer to lift and place a bead keeps building the pincer grasp.
Give them tweezers and a bowl of pom-poms to plant in the dough. Two minutes of setup, and the work runs itself while you finally sit down.
Matching Activities to Your Child’s Age and Needs
The same tub of dough works for a 2-year-old and a 5-year-old, but the job in front of them shouldn’t be the same. Here’s how to match the activity to where your kid actually is, and how to tweak it when they need something different.
From Toddlers to Pre-K
With my June at 3, I still hand her the big, simple stuff first. Younger toddlers want to squish whole-fisted and poke holes with one finger. That’s not them being behind, that’s exactly the grasp development a small hand is built for at that stage.
Older preschoolers can do more, and you can ask more of them. By 4, my Eli was pinching little balls off, pressing them flat, snipping ribbons of dough with scissors. The progression goes about like this:
- Around 2: squishing, pounding, poking with a finger
- Around 3: rolling snakes, pulling off pieces, pressing in beads
- Around 4 and up: pinching, snipping, fine tool work
None of these are hard rules. Early childhood development runs on its own clock, and a kid who skipped rolling will circle back to it. Watch what they reach for. If the snipping frustrates them, drop back to squishing for a week. The dough doesn’t care, and neither should you.
Lefties, ADHD, and Sensory Needs
Some kids need the setup nudged, not the activity changed. - Lefties: Sit across from them so they mirror your grip instead of twisting to copy a right-handed one. Left-handed scissors are non-negotiable; right-handed ones block their view of the cutting line. The NHS pre-scissor sequence lays out the whole pre-scissor build-up.
- ADHD or sensory-seekers: Go firmer and louder. Stiffer dough gives more resistance, which means more of that heavy work through the hands that an OT session leans on. Knead in a little cinnamon or a drop of scent and suddenly the bin holds their attention.
The finger isolation and the sensory play payoff are still there, just packaged for a different kid.
How Long to Practice Each Day
Short and daily beats long and rare, every time. Five to ten focused minutes of dough most days does more for hand strength than one marathon session on a Sunday that ends in a frustrated, tired kid.
Little hands fatigue fast. Push past the point of interest and you teach them dough is a chore, which is the opposite of what you want. Fold it into a daily routine you already have. Ours lived on the kitchen counter while I cooked dinner, two or three nights a week.
The win is the self-directed play. They sit, they squish, they wander off when they’re done. That’s enough. Catch it again tomorrow.
Make Your Own No-Cook Play Dough
Store-bought tubs work fine, but homemade dough costs almost nothing and gives you control over texture from the start, so here’s the basic recipe and how to adjust it.
Ingredients and Quick Recipe
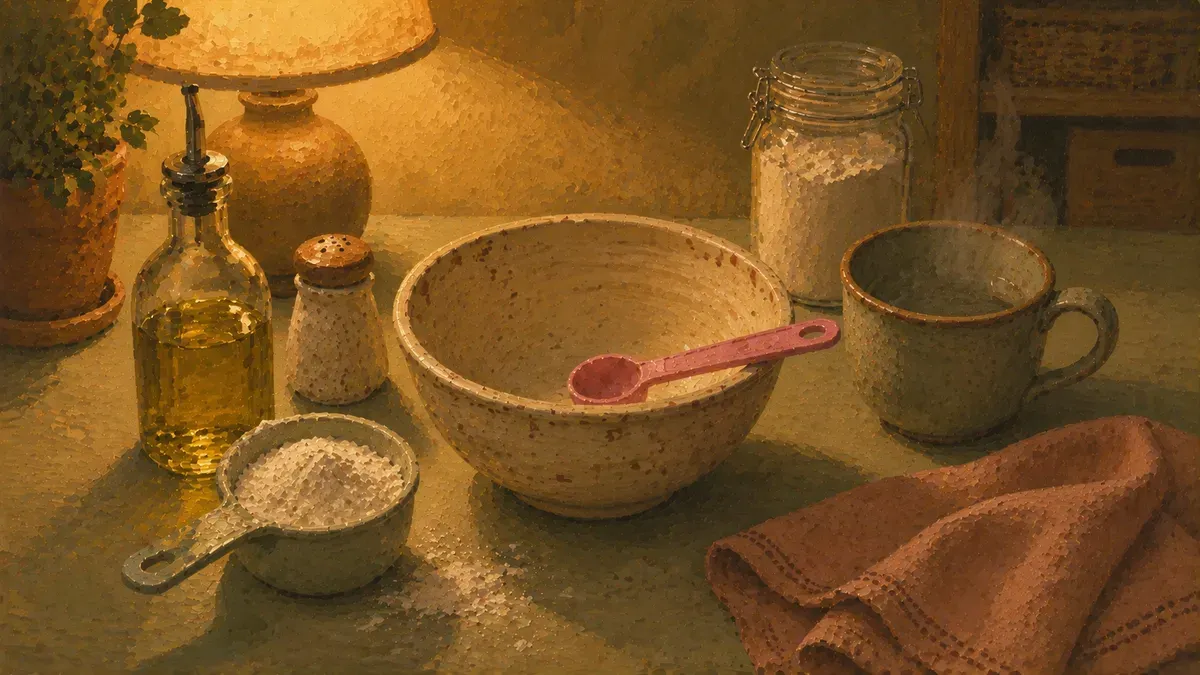
The recipe is 2 cups plain flour, half a cup of salt, 2 tablespoons vegetable oil, 2 tablespoons cream of tartar, and 1 to 1.5 cups boiling water.
Salt preserves it and cream of tartar keeps the texture smooth. Store the finished batch in an airtight container and it stays usable for weeks.
- Mix the flour, salt, cream of tartar, and oil in a bowl.
- Add the boiling water slowly, stirring as you go.
- Knead for about a minute until the dough pulls together.
- Store in an airtight container.
- For color: add food coloring to the water before mixing, or knead in gel color after
- For scent: a teaspoon of vanilla extract, or a packet of unsweetened Kool-Aid mixed in dry
- For a putty-like feel: start with less water and add the rest slowly until the texture is right
Scent and color aren’t just decorative. A kid who walks away from plain dough will sometimes stay for cinnamon dough.
This is also where I point people to fine motor skills games for preschoolers when they want to extend the basics.
Adjusting Texture for More Resistance
For more hand strength work, you want firmer dough. Knead in flour a tablespoon at a time and check the resistance as you go. Chilling the batch in the fridge for 30 minutes stiffens it further without touching the recipe.
For younger kids or children who find stiff dough frustrating, go the other way. A teaspoon of oil or water kneaded through softens it quickly, keeping dexterity work accessible without the fight.
Firmer dough acts like homemade hand putty, forcing the hands to work harder on every squeeze and pinch.
If you want to keep building after they’ve outgrown tabletop dough, our full fine motor skills hub covers what comes next.
Found this useful? Save it for the next rough afternoon.
Questions parents ask me about this
What are the best fine motor activities for preschoolers?
Squeezing, rolling, pinching, and snipping dough hits the most important hand muscles preschoolers need for writing and cutting. Beyond dough, activities like using tweezers to sort small objects, threading beads, and tong transfers build the same finger isolation and precision. The best choice is whatever your child will actually repeat, because consistency beats novelty every time.
At what age can preschoolers start playing with play dough?
Most toddlers are ready to squish and poke dough around age two, and that simple play already builds hand strength. Snipping dough and cutting clay materials develops around ages two and a half to three. Full scissor control typically does not arrive until around age six, so preschoolers are right in the thick of the building phase.
How does play dough help with handwriting readiness?
Dough work loads the small palm muscles that eventually power a stable pencil grip, so the hand arrives at writing already conditioned.
Is store-bought or homemade play dough better for fine motor skills?
For fine motor work, texture and firmness matter more than the brand on the lid. A firmer dough adds resistance and makes the hands work harder. Homemade dough is easy to adjust: knead in a little flour or chill it to firm it up, or add a splash of oil or water to soften it. If the store-bought tub does what your child needs, that is fine too.
What tools should I add to play dough for fine motor practice?
Start simple: a blunt butter knife for pressing and cutting, and a rolling pin for two-handed even pressure. Once those feel easy, add child scissors for snipping, a garlic press for grip force, and golf tees or straws to poke into the dough for finger isolation. Tweezers and tongs are strong pre-scissor readiness tools and add a precision challenge without any sharp edges.
How often should my preschooler do fine motor activities?
Frequency matters more than duration at this age. Even five to ten minutes of dough play each day adds up faster than a single long session on the weekend. The hands build strength through repeated, low-pressure exposure, so weaving it into a routine your child already expects tends to work better than scheduling it as a separate event.
Can play dough help a child who avoids messy textures?
It can, but the approach matters. Start with a drier, less sticky dough and let the child explore on their own terms without pressure. Some kids do better with tools first so their hands stay cleaner. Going slow and following the child's lead tends to work better than any specific technique. If texture aversion is affecting daily life in multiple ways, it is worth mentioning to an occupational therapist who can look at the fuller picture.
Written by
Nora Hayes
Mom of two and a former preschool aide. I share the screen-free sensory play and calm-down ideas I test at my own kitchen table, plus what the moms in my little meet-up swear by. A parent passing on what works, not a doctor or a therapist.
More about NoraKeep going
All Fine Motor-
 Fine Motor
Scissor Practice Worksheets: 10 Steps to Cutting
Most kids snip before they cut shapes. Use these scissor practice worksheets and 10 activities to build the skill step by step. Start today.
-
 Fine Motor
Cutting Worksheets: 15 Activities Beyond Straight Lines
Bored of straight lines? These cutting worksheets and 15 activities build scissor skills fast — and show exactly where to start today.
-
 Fine Motor
Activities to Build Fine Motor Skills With Pom Poms
The hand strength behind neat handwriting starts with play. Try 20 pom pom activities to build fine motor skills your kid will actually beg to do.
-
 Fine Motor
Fine Motor Skills Activity: 5-Minute Warm-Up Routine
A 5-minute fine motor skills activity warms up little hands before handwriting so letters come out neater. Grab the no-prep routine and start today.